Original
paintings in |
|
Original
paintings in |
|
Tips on Drawing and Painting with Acrylics. This is a preview. See much more from the link at the bottom of the page which takes you to a full blog tutorial about drawing and painting from beginners to artists of all levels. New information is added to my blog from time to time. I am simply sharing what I have learned in over a half a century of drawing and painting. We painters never stop learning. Let's start with values Values in drawing or painting are more important than colors. Objects get lighter as they go into the background. An object in the foreground is always stronger than an object in the background. A good way to learn values is to paint in two colors, raw umber and white for example or grey and white. Add white as you go deeper into the background. This produces a value change. Values create depth and give the work a more three dimensional look. Second Time Around Very often I come across something, such as an old grey broken rundown house on a dirt road that really turns me on and is just waiting to be painted. I am not always prepared to capture it at the time and so I go back for it another day. Almost always I never get the same feeling that I had before. It's even worse when I finally photograph it and return to start the painting. Some paintings never get started because of it. The subject more than often loses its charm the second time around. The original excitement is gone. Record it the first time using camera, sketchpad or paint. A photo can be drab and unexciting and I have to try and imagine what it was that turned me on in the first place. I'm told that this is common. You never see the same charm that second time around as you did the first time you saw it. However, using artistic license you can bring back the charm and mystic by changing it just a bit and adding your own thoughts to the work as you paint. Done properly, and with your original reflection on the subject, it can again come alive. Professional and seasoned amateur photographers know how to capture the charm but most of us who paint only use the camera as a tool for painting, and we don't always get the best photos. I use the camera mainly for detail. Painting with Acrylics. Getting Started.
From the print I first did the drawing. Using a set of pointers I scaled the objects from the print. This is how I do any subject for accuracy, especially portraits. Getting the drawing right is half the battle. It's the foundation.
Acrylics dry very quickly. That's why some subjects are better painted in oils, such as portraits, when you need them wet to work. However, to keep acrylics moist all you need is a misting bottle and a flat container with an airtight lid large enough to hold your palette. I use glass over paper towels in a plastic container that is meant for keeping the air from food. You can buy them anywhere plastic food containers are sold. This way when you finish painting you can preserve your unused paint for weeks by pushing the air tight lid onto the container. By spraying your canvas or panel periodically with water you can keep your work wet as long as you wish. The painting above looks ugly at this stage. This is normal and we are not worried about how it looks yet. Rather, we just want to cover the panel and get ready for the next step. Eventually we apply the right colors and the under painting shown above will shine through to some degree. That's why we under paint. Paint should be applied fairly thin like a wash. Below is the finished painting.
The importance of drawing If you have three hours to start and finish a painting, spend two hours drawing it. Before you paint learn how to draw. Start by sketching everything in site and practice every day. Use a soft lead pencil sharpened to a chisel point on sketching paper. The same applies to charcoal. Use a soft eraser and don't worry about mistakes. You learn by making mistakes. If you want to draw people, study anatomy. Get a friend to pose for you. Visualize the bones under the skin. Get a book on anatomy. Draw the human figure in the nude, then the clothing over top. The figure is drawn from the inside out. The ground The 'ground' in painting is the color used to cover the entire canvas or panel before starting the picture. Often white is used but any color that suits the work to be done is suitable. The ground should be of a paste texture, smooth and workable, but not too thick. It is applied with a large, usually a two inch brush. Materials needed
Easel or Wall Painting in oils with canvas resting on the wall under daylight fluorescent tubes is ideal if painting at night. Don't use incandescent lamps as they produce glare and you cannot see the true color of your work. You can use the newer LED daylight bulbs which give plenty of workable light. I use them. A simple wooden ledge screwed to the wall is all you need to support your canvas. Mahlstick Mahlsticks are used for the fine detailed work to keep your hand steady. Sign painters used to use them before computers. We painters still use them. They need not be elaborate. All you need is a pole such as a half inch tent pole with the rubber end on it. Perfect. Or you can make one from a 36 inch long half inch diameter hardwood dowel and put a rubber end on it. Canvas or panel Stretched canvas is the generally accepted material for a painting if it is to be sold through agents or the galleries. However hardboard, or masonite as it is called in the lumber trade, is also very suitable and tough against knocks, wear and tear. Hardboard, or masonite should be treated with at least three coats of non gloss paint or artists' Gesso and allowed to dry thoroughly before starting your picture. I have done many paintings using hardboard and Gesso and sometimes just paint as a preparation for the surface. If you use the back or rough side of masonite the finished painting will look like high grade canvas. Panel behind stretched canvas Hardboard or masonite can be used behind canvas for larger paintings. The stretcher frame under the canvas on larger paintings tends to telegraph through to the painting surface. Using a panel between the stretcher frame and the canvas will solve the problem. Remove the canvas, install the panel using carpenters' glue over the stretcher frame, then re-install the canvas. Primary colors As stated above, the primary colors which are yellow, red and blue are all you need to paint a picture. Due to the impurities of the pigment in paint you will also need white. Mix them and see the colors, any color from these four. Using a smaller number of colors makes your work easier because it is easier to blend all your colors in harmony as you do the painting. Where to paint You can paint anywhere you like. You don't need a studio, although it's nice to have. Painting outdoors is fun and healthy and all you need is an easel or something to rest your canvas or panel on. Smaller panels are more suitable when painting outdoors. Never use a large canvas outdoors as they are too difficult to carry around especially when they are wet. You are after a feeling, colors and a sketch when outdoors and not a finished painting. Finish it at home later. Ventilation and light Always paint in a well ventilated area when using traditional oil paints, especially if you use turpentine. A small room or just enough space to put your work on the wall and stand back about four feet is all you really need. Use daylight fluorescent or daylight LED lighting when painting at night and north light if you are lucky when painting during the day. You don't want shadows and you don't want glare or you can't see what you are doing. Using only linseed oil I paint with no turpentine. I use only linseed oil which is non toxic and there is no odor, masked or otherwise. Ventilation is not as critical when not using turpentine. Cleaning brushes Hand soap bars and warm, but not hot, water are best. Just work them with your fingers and soap until there is no more paint on the brushes. Afterwards, use paper towels to wipe dry and wrap them so they keep their shape and don't curl up at the edges. This works for oils and acrylics. While painting it is important to keep the brushes moist with oil for oil painting and water for acrylic painting. With oils you can just drop the brushes into oil and they will keep well until next time....but not for days or the bristles tend to curl. Copying other artists' work Copy if you like for your own use or as a learning exercise, but don't sell it. If asked, state that it is a copy. Do not sign it. Oil painting techniques Four techniques come to mind that are quite easy and produce excellent work. They are as follows:
|
Updated January 26, 2026
 Here
is a step by step tutorial showing how I painted this painting in
acrylics. First I drove out of town to where I spotted an old
abandoned farmhouse. With the digital camera I took many shots of
the property. They were put into the computer and one with good
composition was printed for detail.
Here
is a step by step tutorial showing how I painted this painting in
acrylics. First I drove out of town to where I spotted an old
abandoned farmhouse. With the digital camera I took many shots of
the property. They were put into the computer and one with good
composition was printed for detail.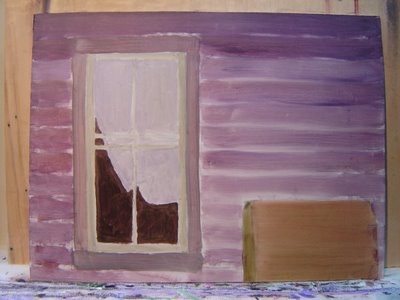 Using
colors red, yellow, blue, purple, burnt sienna and white, I mixed
until I got various shades of grey suitable for the first stage.
I then covered the canvas applying the brush strokes to agree
with the direction of the wood grain in the structure. At this
stage I am applying only a thin wash and if I can still see the
drawing under the paint, all the better. I always try not to lose
my drawing until near the end when I no longer need it.
Using
colors red, yellow, blue, purple, burnt sienna and white, I mixed
until I got various shades of grey suitable for the first stage.
I then covered the canvas applying the brush strokes to agree
with the direction of the wood grain in the structure. At this
stage I am applying only a thin wash and if I can still see the
drawing under the paint, all the better. I always try not to lose
my drawing until near the end when I no longer need it.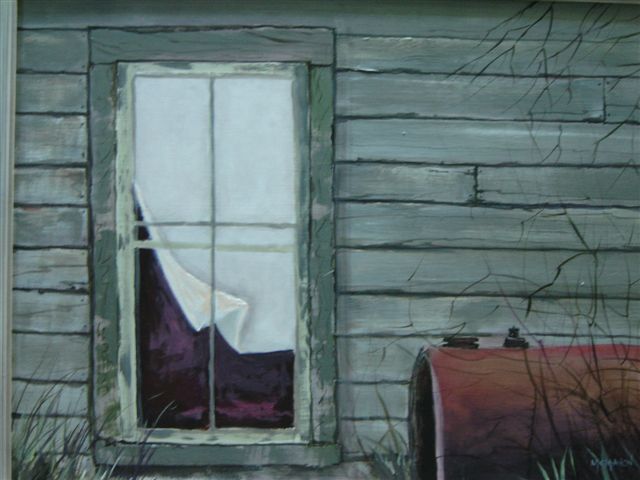 It
needed more grey and I got grey by mixing colors until I found
the right shade. Did a lot of dry brushing by just very lightly
dragging the brush with only a bit of paint on it over the window
frame at the same time allowing the under painting to show
through. This gave the effect of old wood with peeling paint. The
painting was framed and to match the work I painted the frame
with the same acrylics, once again letting the original color of
the frame show through. The original frame had been a dull green
grey color,just right for adding a bit of grey from the painting.
The painting was hung in a gallery and later published.
It
needed more grey and I got grey by mixing colors until I found
the right shade. Did a lot of dry brushing by just very lightly
dragging the brush with only a bit of paint on it over the window
frame at the same time allowing the under painting to show
through. This gave the effect of old wood with peeling paint. The
painting was framed and to match the work I painted the frame
with the same acrylics, once again letting the original color of
the frame show through. The original frame had been a dull green
grey color,just right for adding a bit of grey from the painting.
The painting was hung in a gallery and later published.